
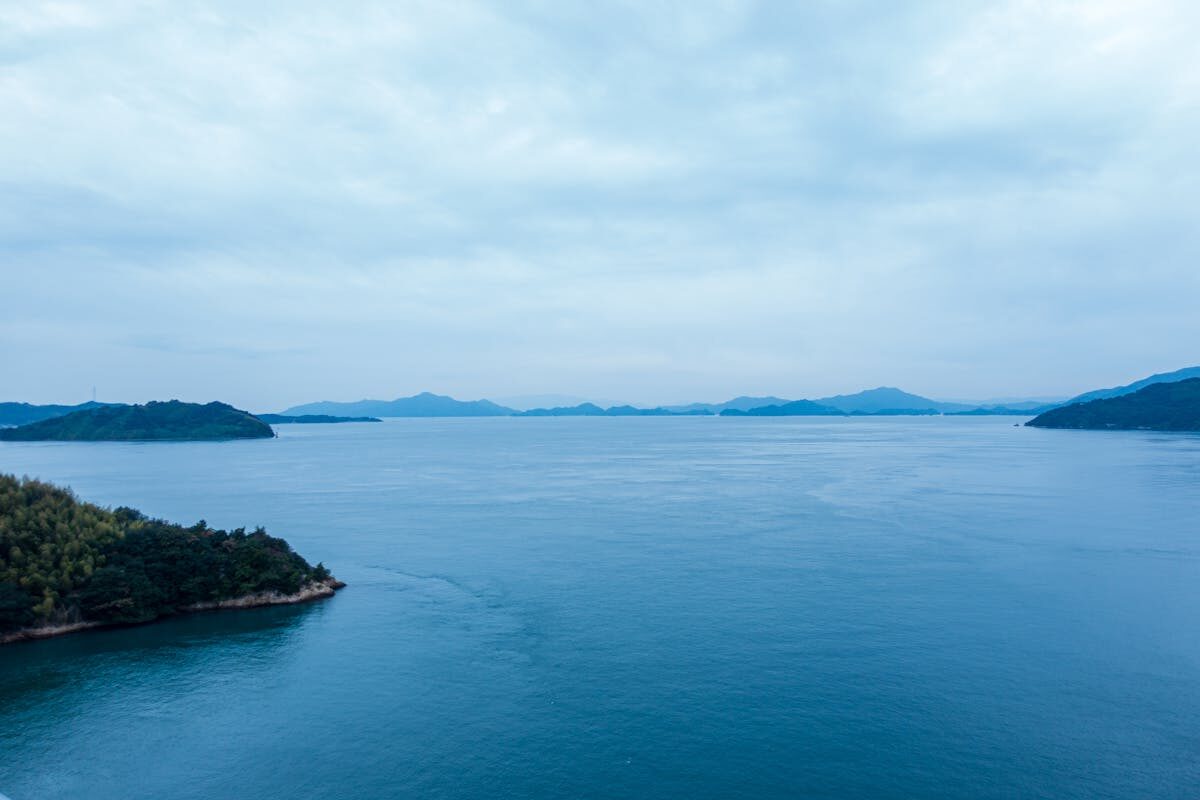
There’s a 70km stretch of road, bridges, and islands between Hiroshima Prefecture and Ehime Prefecture that has quietly become one of the greatest cycling routes on the planet. The Shimanami Kaido connects the city of Onomichi on Honshu to the city of Imabari on Shikoku, threading across six islands in the Seto Inland Sea via a series of enormous suspension bridges. Each bridge has a dedicated cycling and pedestrian lane. The route is marked by a blue line painted directly on the road surface, so navigation is essentially foolproof. And the scenery — calm inland sea, citrus groves, fishing villages, distant mountain silhouettes — is the kind of quiet beauty that sticks with you long after the ride is over.
I’ll say it plainly: if you have even a passing interest in cycling and you’re visiting Japan, the Shimanami Kaido should be on your list. It doesn’t require special fitness. It doesn’t require your own bike. It doesn’t require any Japanese language ability. What it does require is a willingness to slow down, pedal at your own pace, and let the islands unfold around you.
This guide covers everything you need to plan the trip from scratch — route details, bike rental, where to eat and sleep, island-by-island highlights, budget, and logistics. Let’s get into it.
- Why the Shimanami Kaido
- The Route at a Glance
- One Day or Two?
- One Day
- Two Days
- Half-Day Option
- Bike Rental
- Public Rental System (Shimanami Japan)
- Private Rental (Giant Store, etc.)
- E-bikes: Worth It?
- My Take
- Island-by-Island Guide
- Mukaishima
- Innoshima
- Ikuchijima
- Omishima
- Hakatajima
- Oshima
- Where to Eat Along the Route
- Onomichi (Before You Start)
- Ikuchijima / Setoda (Mid-Route)
- Omishima
- Imabari (When You Arrive)
- Snacks and Hydration
- Where to Stay
- Ikuchijima (Setoda Area)
- Omishima
- Free Camping
- Imabari
- Practical Tips
- Follow the Blue Line
- Bridge Approaches
- Bridge Tolls
- Luggage Forwarding
- Which Direction?
- Best Time to Ride
- What to Bring
- Getting There
- Getting to Onomichi
- Getting to Imabari
- Returning After the Ride
- Budget Breakdown
- One-Day Budget
- Two-Day Budget
- Is It Worth It?
Why the Shimanami Kaido
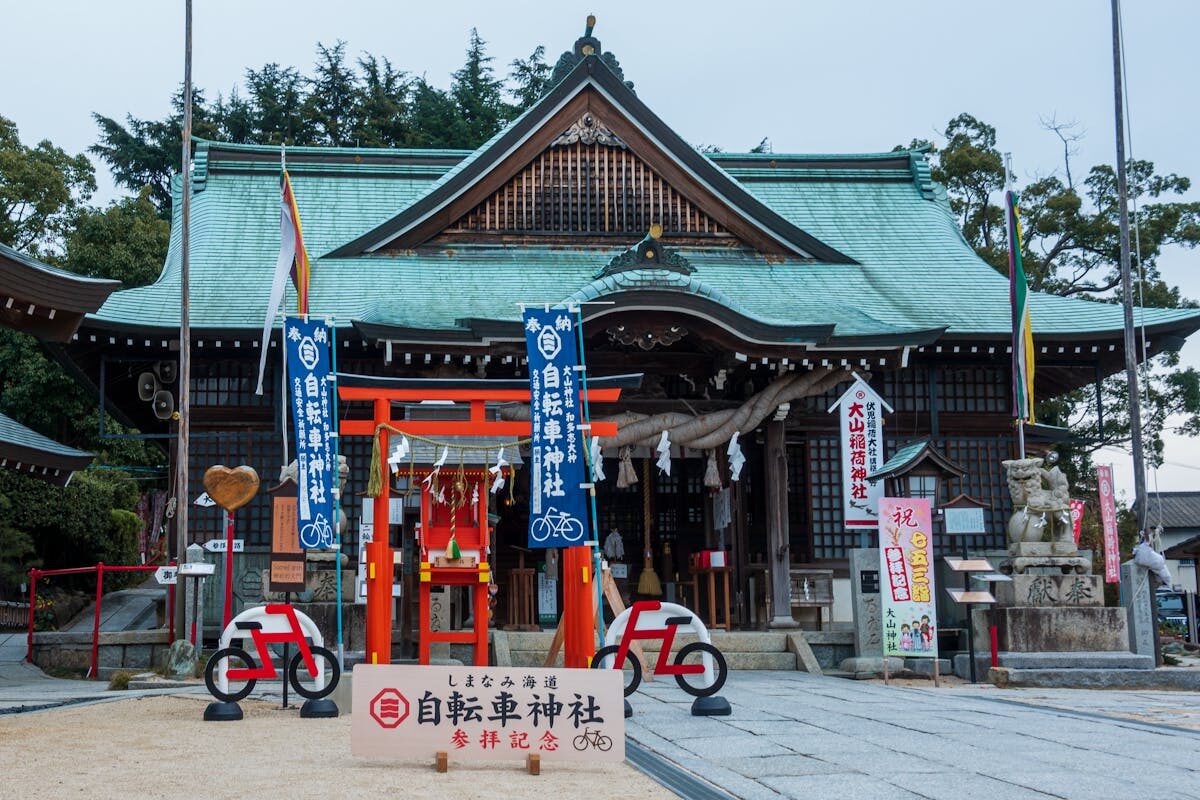
Japan has no shortage of scenic cycling routes, but the Shimanami Kaido occupies a category of its own. It’s not a mountain pass grind. It’s not an urban bike path. It’s a genuine island-hopping adventure where you ride across massive bridges high above the sea, coast through sleepy fishing towns, and stop whenever something catches your eye — a shrine, a beach, a roadside stand selling fresh mikan juice.
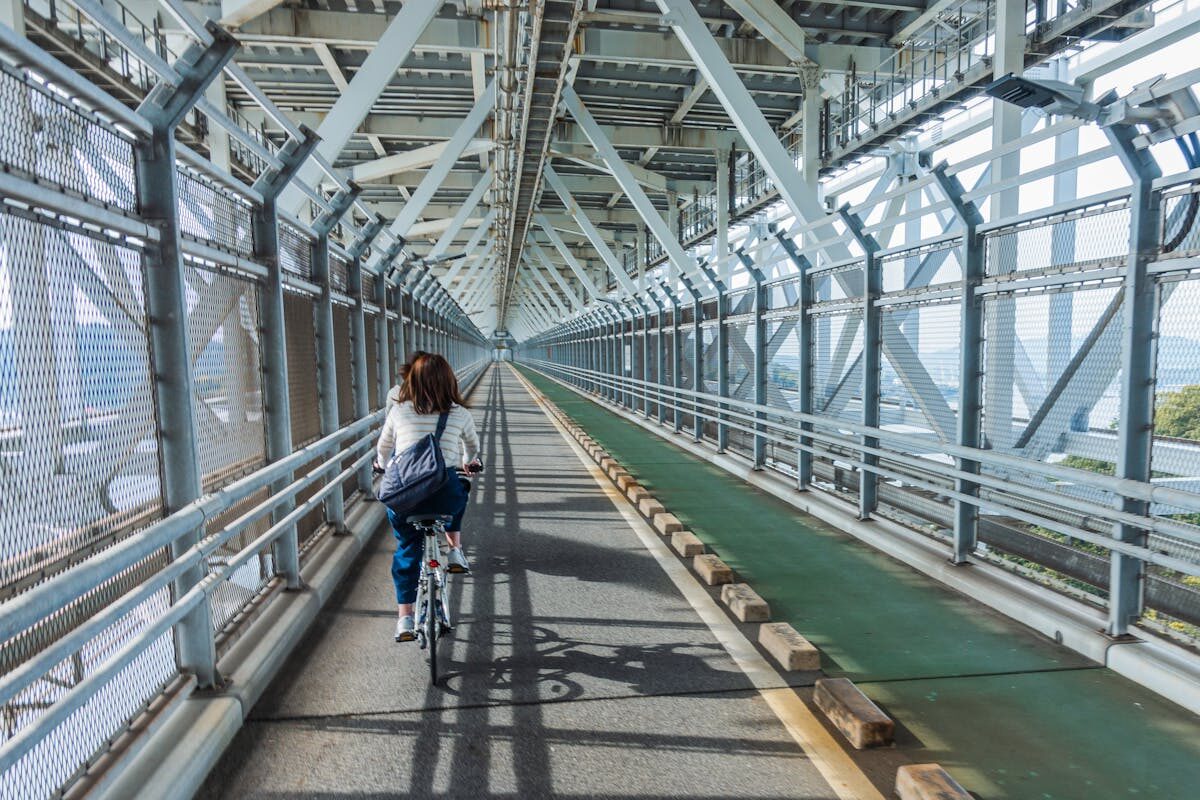
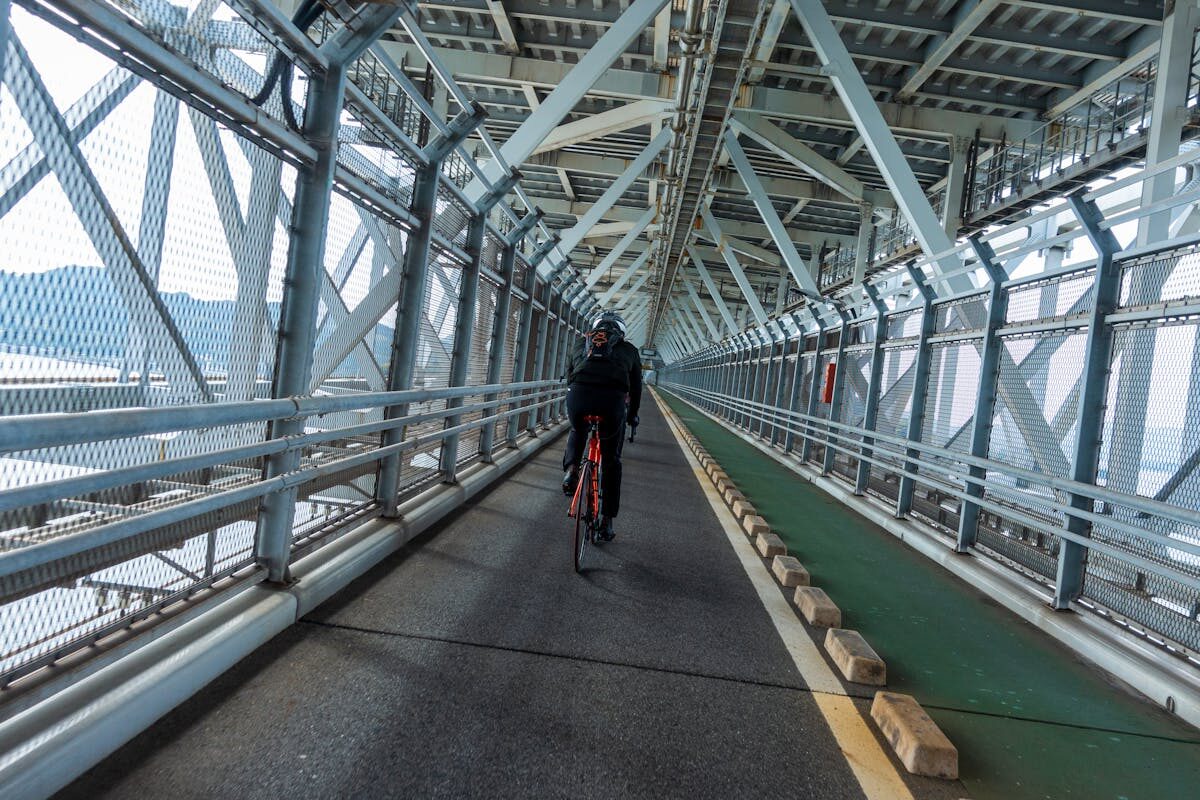
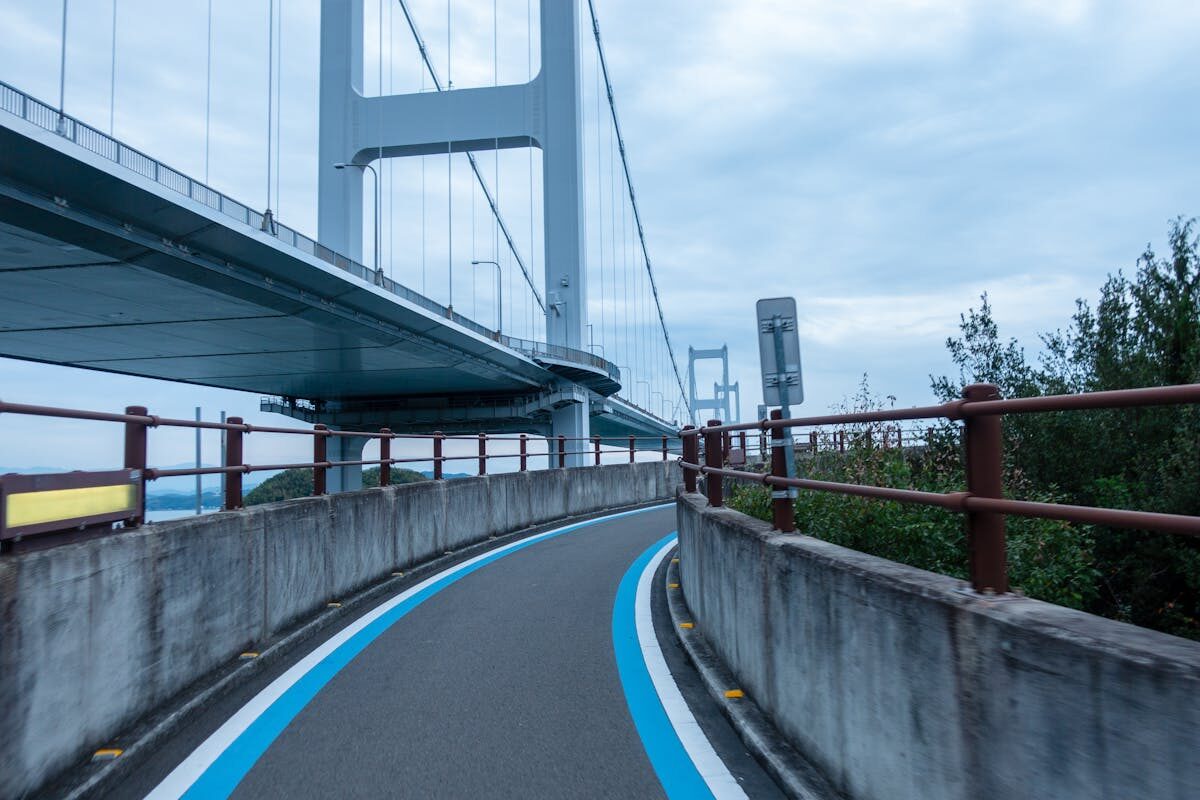
The dedicated cycling infrastructure is what makes it accessible. The bridges, which carry the Nishi-Seto Expressway for cars, all have separate bike and pedestrian paths. These are wide, well-maintained, and completely separated from vehicle traffic. You’re riding across bridges that span kilometres of open water, looking down at cargo ships and fishing boats, with nothing between you and the view but a railing and the wind.
Between bridges, the route follows quiet island roads. Traffic is minimal. The terrain is mostly flat along the coast, with the only real climbing being the approach ramps up to each bridge (more on those later). It’s a ride that works for serious cyclists looking for a fast day ride and for casual riders who want to take two days and stop for every photo opportunity and bowl of ramen along the way.
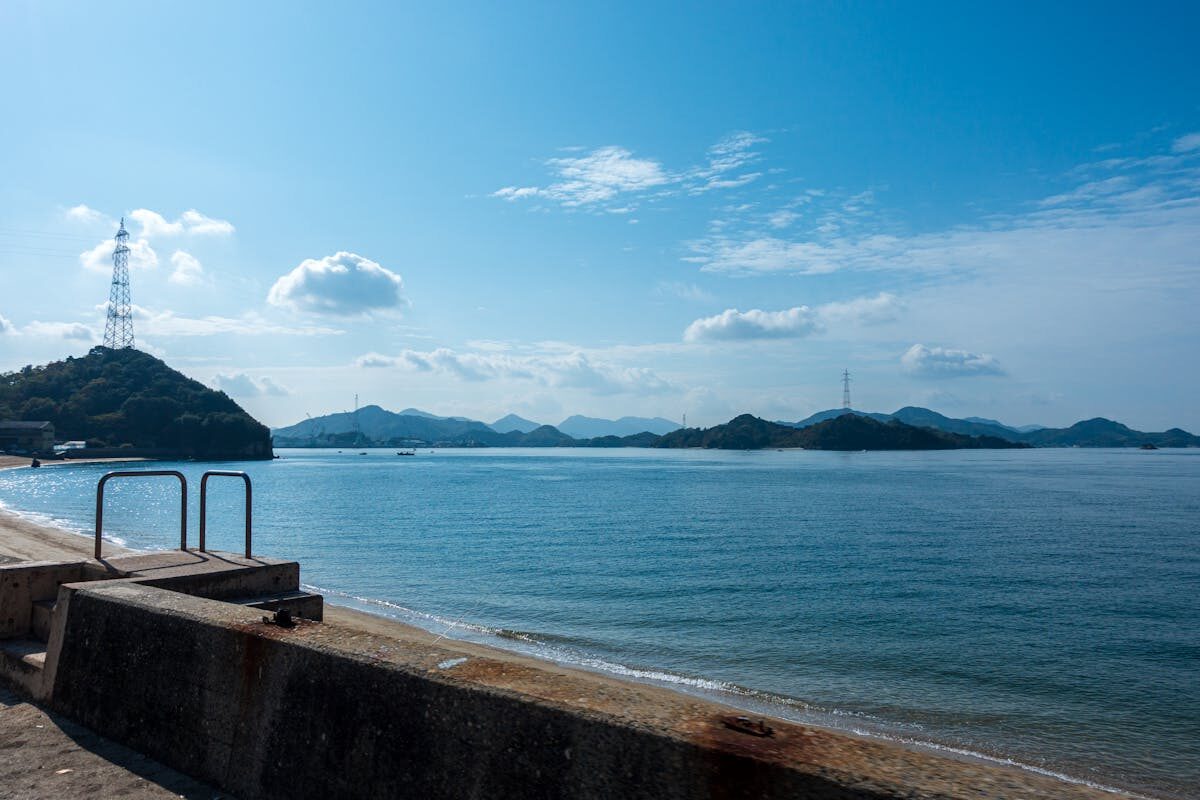
The other thing worth saying: the Seto Inland Sea is genuinely gorgeous. It’s not dramatic in the way that, say, the Norwegian fjords are. There are no towering cliffs or crashing surf. The beauty here is softer — hundreds of small islands scattered across still water, the light changing constantly, the occasional orange grove running down to the shoreline. It’s the kind of landscape that rewards attention rather than demanding it.
The Route at a Glance
The full route runs approximately 70km from Onomichi to Imabari (or vice versa), crossing six islands connected by six bridges. Here’s the breakdown:
| Section | Bridge / Ferry | Distance | Cumulative | Key Highlights |
|---|---|---|---|---|
| Onomichi → Mukaishima | Ferry (5 min) | ~1km crossing | 0km | Ferry departure from Onomichi waterfront |
| Mukaishima → Innoshima | Innoshima Bridge | ~7km | 7km | First bridge crossing, residential island |
| Innoshima → Ikuchijima | Ikuchi Bridge | ~13km | 20km | Ikuchi Bridge views, entering the best stretch |
| Ikuchijima → Omishima | Tatara Bridge | ~15km | 35km | Setoda town, Kosanji Temple, Sunset Beach |
| Omishima → Hakatajima | Omishima Bridge | ~7km | 42km | Oyamazumi Shrine, WAKKA resort |
| Hakatajima → Oshima | Hakata-Oshima Bridge | ~8km | 50km | Hakata Salt Factory, smallest island |
| Oshima → Imabari | Kurushima Kaikyo Bridge | ~20km | 70km | Longest bridge, dramatic final crossing |
The distances above are approximate and will vary slightly depending on your exact route through each island. Detours to temples, viewpoints, or restaurants will add kilometres. A realistic total with a few side trips is more like 75-80km.
Navigation is dead simple. A blue line is painted on the road surface along the entire route. You follow the blue line. That’s it. There are also regular signposts in Japanese and English indicating distances and directions. I’ve heard of people downloading GPS routes and using phone mounts, and that’s fine, but honestly the blue line is all you need. It runs from Onomichi port all the way to the Sunrise Itoyama terminal in Imabari. You literally cannot get lost unless you deliberately leave the marked route for a detour.
One Day or Two?
This is the first big decision, and I have a strong opinion: do two days if your schedule allows it.
One Day
A one-day ride is absolutely doable. The 70km distance is manageable for anyone with reasonable fitness, and even casual cyclists can complete it in 6-8 hours of actual riding time. If you’re a regular cyclist, you could knock it out in 4-5 hours without pushing too hard.
But here’s the thing — a one-day ride turns the Shimanami Kaido into a transportation exercise. You’ll be focused on making distance, not on the islands themselves. You won’t have time to explore Setoda’s backstreets, or visit Oyamazumi Shrine, or sit on Sunset Beach eating lemon gelato while watching the light change over the water. You’ll ride across six islands and barely touch any of them.
If one day is genuinely all you have, it’s still worth doing. The bridges alone are worth the ride. But you’ll leave knowing you missed a lot.
Two Days
Two days is the sweet spot. You split the ride roughly in half, stay overnight on one of the islands, and actually experience the place rather than just passing through it. The riding each day is relaxed — 30-40km — leaving plenty of time for detours, meals, swimming (in summer), and aimless wandering through fishing villages.
The two best overnight stops are Ikuchijima (specifically the Setoda area, around the 30km mark) and Omishima (around the 40km mark). More on accommodation later, but both islands have good options ranging from budget hostels to proper resorts.
My recommendation: ride to Ikuchijima on day one, explore Setoda and the surroundings, stay the night, then finish the ride to Imabari on day two. This gives you a slightly longer first day and a shorter second day, which works well psychologically — you wake up knowing you’re already more than halfway.
Half-Day Option
If you’re short on time or not confident about the full distance, you can ride just a portion of the route and ferry back. The public bike rental system lets you drop off at any terminal, so you could ride from Onomichi to Ikuchijima (about 30km), return the bike at the Setoda terminal, and take a ferry back to Onomichi or onward to Hiroshima.
This half-day version still gives you three islands, two bridge crossings, and enough of the experience to understand what makes the route special. It’s a perfectly valid option and nothing to feel sheepish about.
Bike Rental
You have two main options for renting a bike: the public rental system or a private shop. Here’s how they compare.
Public Rental System (Shimanami Japan)
This is what most people use, and for good reason. The public system operates 10 rental terminals along the route — at Onomichi, on each island, and at Imabari. You can pick up a bike at any terminal and drop it off at any other terminal. This flexibility is the system’s biggest advantage.
Rates are straightforward:
- City bike (standard geared bicycle): ¥3,000/day
- E-bike (electric assist): ¥4,000/day
- Helmets included and mandatory
The main terminals for starting are the Onomichi Station terminal (right next to JR Onomichi Station) and the Sunrise Itoyama terminal in Imabari. Both have large fleets and are easy to find.
The bikes themselves are basic. They’re standard city bikes — upright riding position, basket on the front, multiple gears but nothing fancy. They’re maintained well enough, and they get the job done. You’re not going to set any speed records, but comfort over 70km is reasonable. The saddles aren’t great, so if you have padded cycling shorts, bring them.
Reservations are recommended, especially on weekends and during peak seasons (spring and autumn). You can book online through the Shimanami Japan website. Walk-ups are possible but not guaranteed, particularly for e-bikes which have limited stock.
Private Rental (Giant Store, etc.)
If you want a better bike, the Giant Store in Onomichi rents road bikes and cross bikes ranging from ¥4,000 to over ¥10,000 per day, depending on the model. The quality difference is significant — proper road bike geometry, lighter frames, better components. If you’re an experienced cyclist who cares about the ride quality, this is worth the premium.
The catch: Giant charges a ¥3,300 one-way drop-off fee if you return the bike at their Imabari store instead of bringing it back to Onomichi. So a one-way ride on a Giant rental runs ¥7,300-13,300+ for the bike alone. That said, the riding experience on a proper road bike versus a public rental city bike is night and day, especially over 70km.
There are a few other private rental shops in Onomichi and Imabari, with varying stock and prices. Giant is the most established and reliable option.
E-bikes: Worth It?
If you cycle regularly and have decent fitness, you don’t need an e-bike. The route is mostly flat, and the only climbs are the bridge approach ramps — long, gradual inclines that are tiring but not steep. A fit cyclist won’t find them challenging.
If you don’t cycle much, or if you’re doing the ride with someone who has significantly different fitness levels, e-bikes are genuinely worth the extra ¥1,000. The bridge approaches can feel relentless on a heavy city bike when your legs are already tired, and the electric assist takes the sting out. You’ll also have more energy for actual sightseeing rather than arriving at each island already spent.
One caveat: e-bike battery range. The public system e-bikes are rated for about 60-80km depending on how much assist you use. If you’re running the motor on high the entire time and taking detours, you could run low before Imabari. Use the assist for the climbs and cruise under your own power on the flats. You can also swap batteries at some rental terminals, but don’t count on this — check availability when you pick up the bike.
My Take
For most people, the public rental system is the right call. The bikes aren’t exciting, but they’re reliable, the pickup/drop-off flexibility is unbeatable, and ¥3,000-4,000 for a full day is excellent value. Save the money for food and accommodation. If you’re a cycling enthusiast who wants a proper ride, go Giant or bring your own bike — you’ll appreciate the difference.
Island-by-Island Guide
Here’s what you’ll find on each island, in order from Onomichi to Imabari.
Mukaishima
Distance across: ~5km
Time: 20-30 minutes
Worth stopping? Not really.
Mukaishima is the first island, and you reach it by ferry from Onomichi’s waterfront. The crossing takes about five minutes and costs ¥110 including your bike. There’s no bridge between Onomichi and Mukaishima because the channel is too narrow and busy with ship traffic — the ferry is the only option, and it runs frequently.
The island itself is residential and unremarkable. You’ll ride through quiet neighbourhoods, past a few small shipyards, and over the Innoshima Bridge to the next island. Don’t linger here — the good stuff is ahead.
One practical note: if you rented from the Onomichi Station terminal, you’ll ride down to the ferry dock (a few minutes), take the ferry across, and then pick up the blue line on Mukaishima. The route is well-signed from the ferry landing.
Innoshima
Distance across: ~8km
Time: 30-45 minutes
Worth stopping? Only for the Suigun Castle detour.
Innoshima is the second island, and like Mukaishima, most cyclists pass through without spending much time here. The main route follows the southern coast, passing through a mix of residential areas and farmland.
The one potential detour is the Innoshima Suigun Castle ruins, a reconstructed castle perched on a hilltop that was once a base for the Murakami pirates — a naval clan that controlled the Seto Inland Sea for centuries. The castle itself is a modern reconstruction and the museum inside is modest, but the hilltop views are good. It’s a 2km detour off the main route and involves a steep climb, so only go if you’re interested in the pirate history angle.
The real highlight of Innoshima is leaving it. The Ikuchi Bridge from Innoshima to Ikuchijima is one of the most photogenic crossings on the route — a cable-stayed bridge with excellent views in both directions. You’ll start to understand what all the fuss is about once you’re out on this bridge with nothing but sea and sky around you.
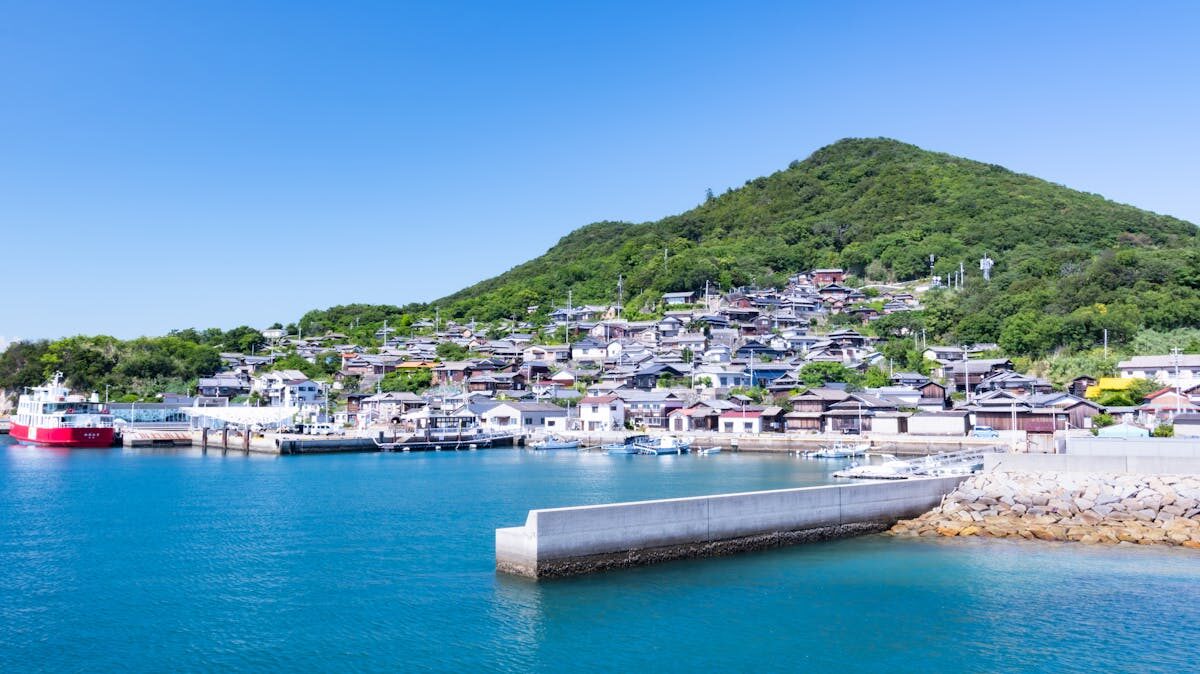
Ikuchijima
Distance across: ~12km (more with detours)
Time: 1-3 hours depending on stops
Worth stopping? Absolutely. This is the star of the route.
Ikuchijima is where the Shimanami Kaido shifts from “nice bike ride” to “genuinely memorable experience.” The Setoda area, on the island’s northern shore, is the cultural heart of the route, and it’s where I’d recommend spending the most time.
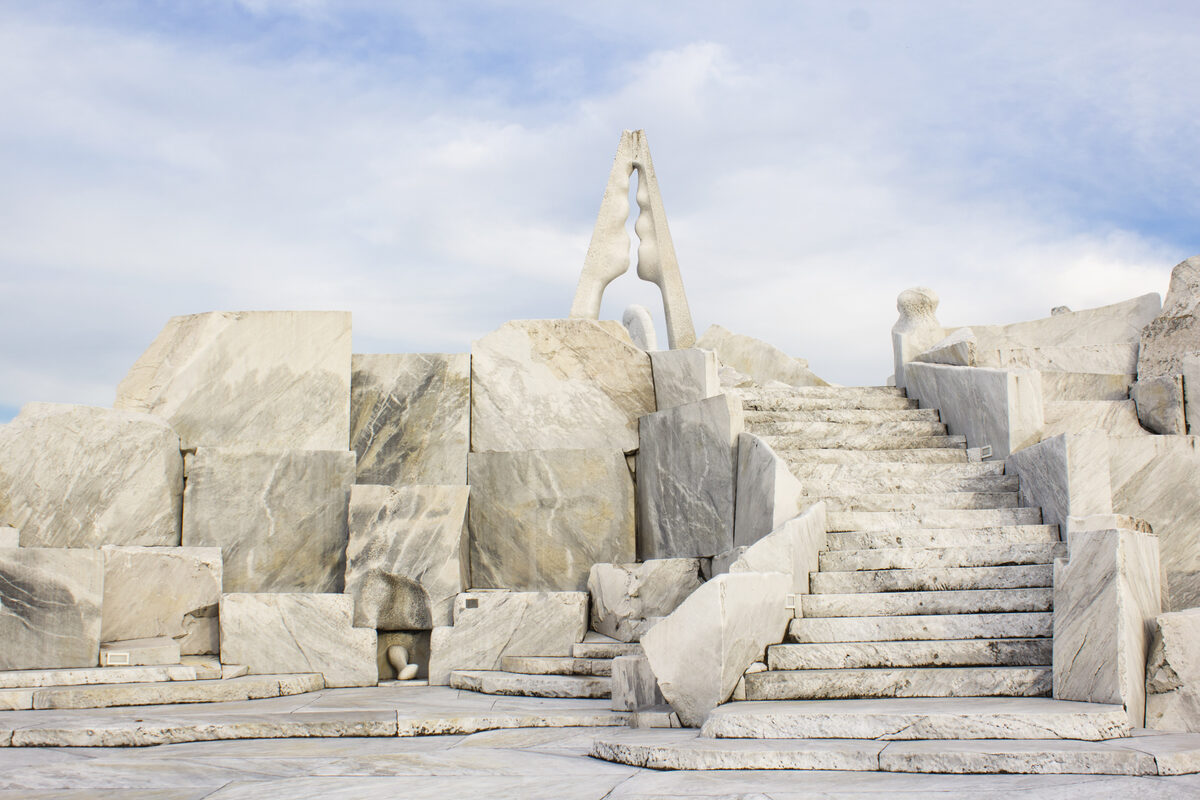
Kosanji Temple (¥1,400 entry) is the headline attraction, and it’s one of the strangest temples you’ll visit in Japan. Built by a wealthy businessman in the 20th century as a tribute to his mother, it’s a chaotic mashup of architectural styles borrowed from famous temples across Japan — bits of Nikko Toshogu, pieces of Byodoin, elements of various Kyoto temples, all crammed together on one hillside. The Hill of Hope at the top, a marble sculpture garden by Kazuto Kuetani, offers panoramic views of the surrounding islands. Whether you love it or find it garish is a coin flip, but it’s undeniably interesting and unlike anything else in the country.
Hirayama Ikuo Museum of Art is near Kosanji and worth a visit if you have time. Hirayama was born in Setoda and became one of Japan’s most celebrated painters, known for large-scale works depicting the Silk Road. The museum is well-curated and peaceful.
Setoda town itself is worth wandering. The traditional shopping street (Shiomachi Shoutengai) has old wooden buildings, small cafes, and shops selling Setoda’s famous lemons in every imaginable form — lemon cakes, lemon curd, lemon soda, lemon everything. Setoda lemons are a serious regional product, grown on the island’s terraced hillsides, and the quality is genuinely excellent.
Sunset Beach is a sand beach near Setoda that’s perfectly fine for a swim in summer. It’s not a tropical paradise, but after 30km on a bike, the water feels incredible. There are showers and changing facilities.
If you’re doing a two-day trip, Ikuchijima is the best place to stay the first night. You’ll arrive having covered roughly half the route, and the Setoda area has the most accommodation options and the most to do in the evening.
Omishima
Distance across: ~10km
Time: 1-3 hours depending on stops
Worth stopping? Yes, especially for Oyamazumi Shrine.
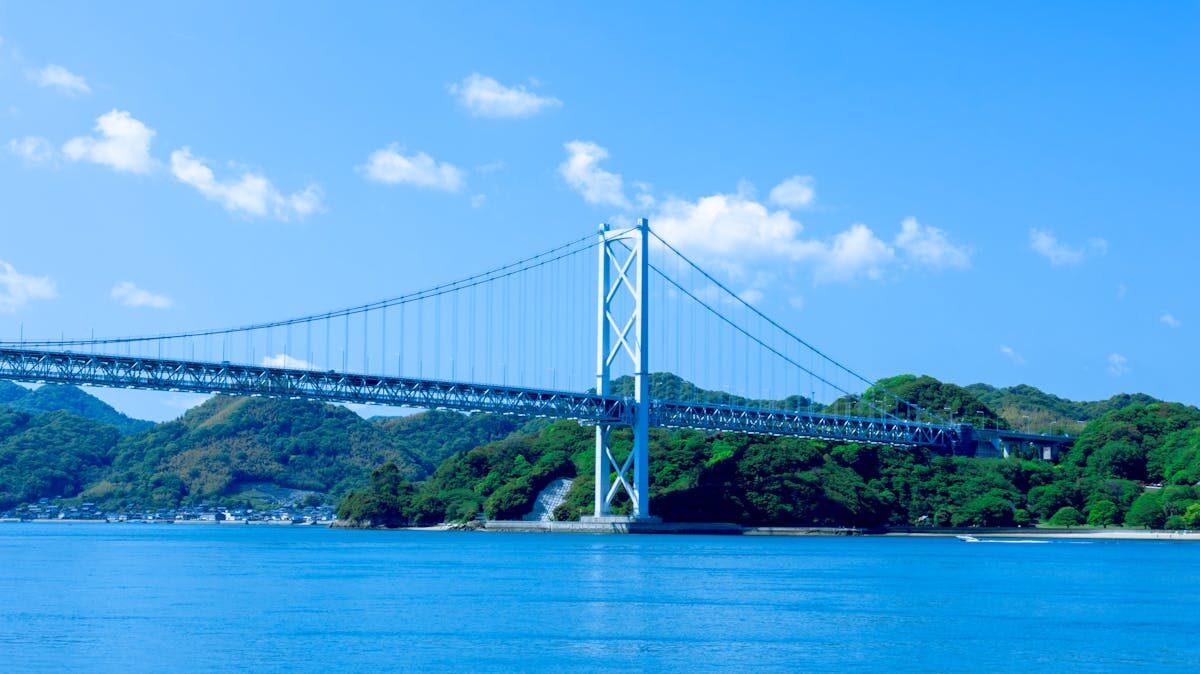
You reach Omishima via the Tatara Bridge, which at 1,480m is one of the longest cable-stayed bridges in the world. There’s a rest stop and viewpoint at the midpoint of the bridge — it’s worth pausing here to take in the view, especially on a clear day when you can see islands in every direction.
Omishima is known as the “spiritual island” of the Shimanami Kaido, and the reason is Oyamazumi Shrine. This is one of the most significant Shinto shrines in western Japan, with a history stretching back over 2,600 years (or so the tradition claims). What makes it genuinely remarkable is its treasure hall, which houses the largest collection of samurai armour and weaponry in Japan — approximately 80% of all nationally designated armour and helmet artifacts are here. We’re talking about actual armour worn by historical samurai lords, swords from the Kamakura period, and helmets that are genuine works of art. Even if you’re not a history person, the scale and quality of the collection is impressive. Entry to the treasure hall is ¥1,000 and worth every yen.
The shrine grounds are beautiful in their own right — ancient camphor trees, a peaceful atmosphere, and far fewer travelers than comparable shrines in Kyoto or Nara. Allow at least an hour for the shrine and treasure hall.
Omishima is also the location of WAKKA, a cyclist-focused resort near Inokuchi Port. It’s the second-best overnight option on the route (after Setoda), with a range of accommodation from dorm beds to cottages to glamping domes. More on this in the accommodation section.
The island is quieter than Ikuchijima and more rural.
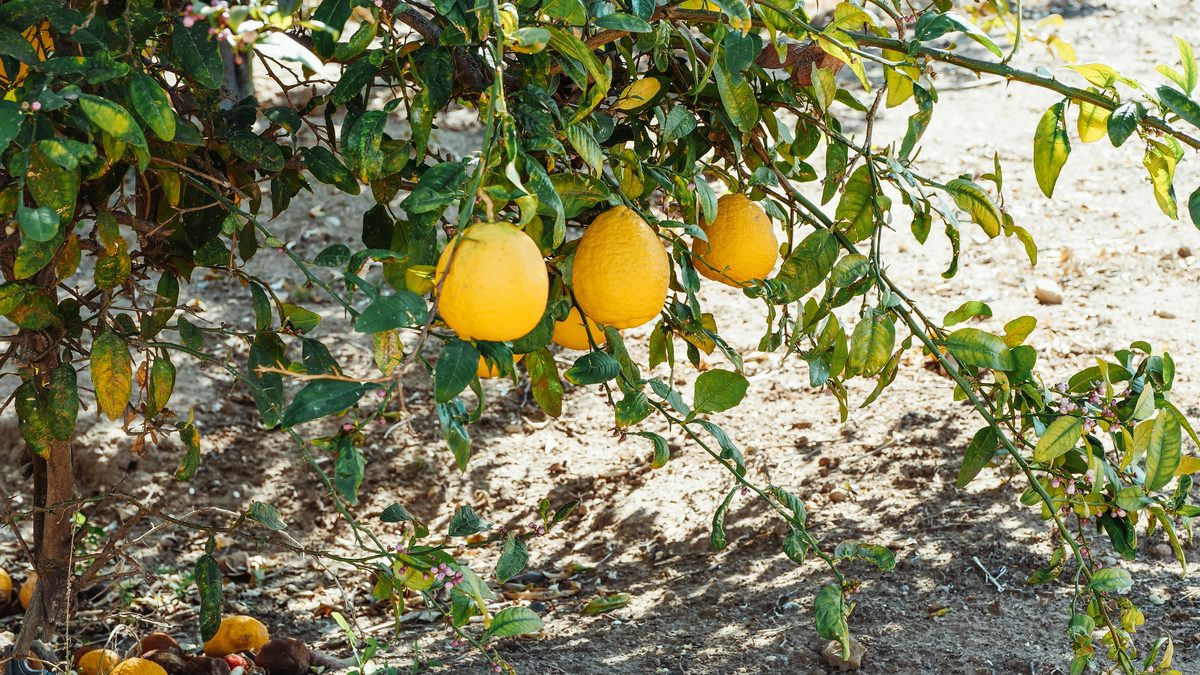
Mikan (mandarin orange) groves are everywhere, and in season (roughly October to February) you’ll see them for sale at unmanned roadside stalls — leave your coins in the box and take a bag. They’re absurdly good.
Hakatajima
Distance across: ~5km
Time: 20-30 minutes
Worth stopping? Only for the salt factory if you’re interested.
Hakatajima is the smallest island on the route and the one most cyclists pass through quickest. There’s not much here beyond quiet roads and ocean views, which is honestly fine — by this point in the ride, you might welcome a stretch of simple pedalling without the pressure to stop and see things.
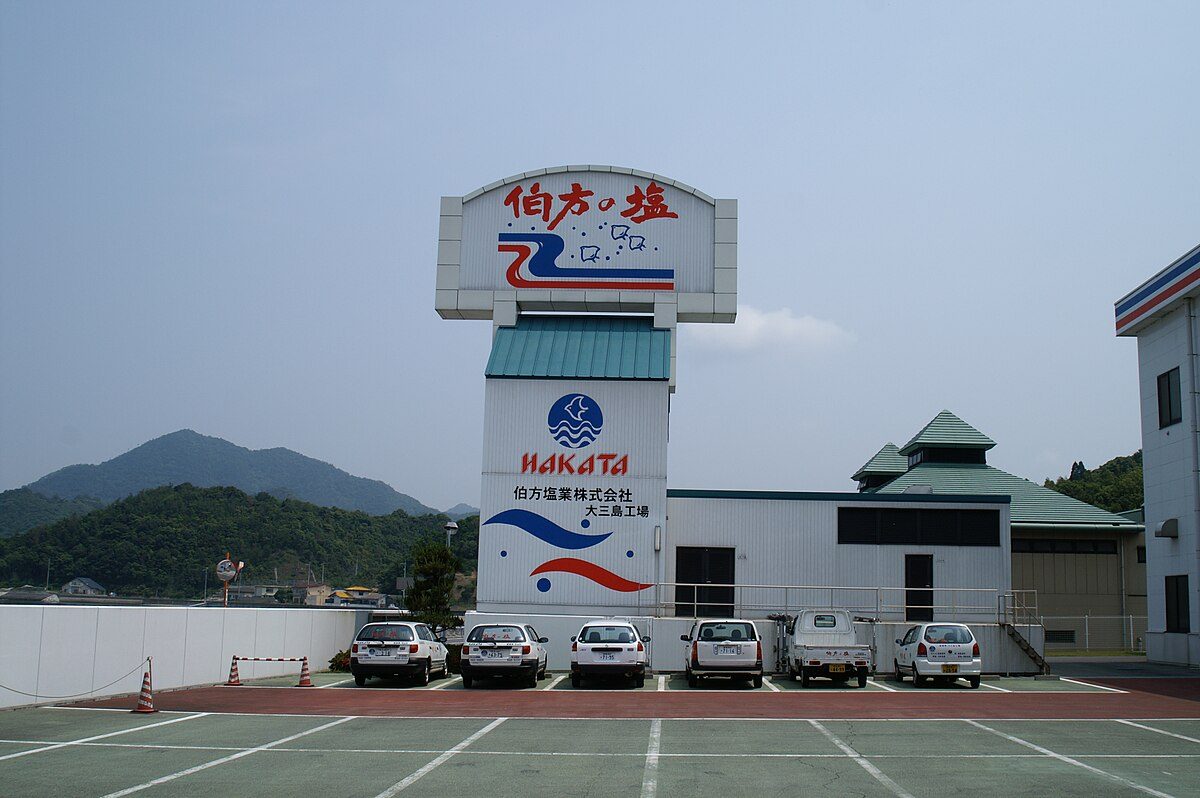
The one attraction is the Hakata Salt Factory, where you can see traditional salt production and buy various salt products. It’s a quick stop if you’re curious about how sea salt is made in the traditional way, but it won’t change your life.
The practical concern about Hakatajima is infrastructure. There are fewer convenience stores and vending machines here than on the other islands. If you’re running low on water or snacks, stock up before you arrive — ideally on Omishima.
Oshima
Distance across: ~10km to the Kurushima bridge
Time: 45 minutes to 1.5 hours
Worth stopping? For the viewpoint, yes.
Oshima is the last island before Imabari, and it builds anticipation for the grand finale — the Kurushima Kaikyo Bridge crossing. The island itself is pleasant, with a mix of residential areas, small farms, and coastal roads.
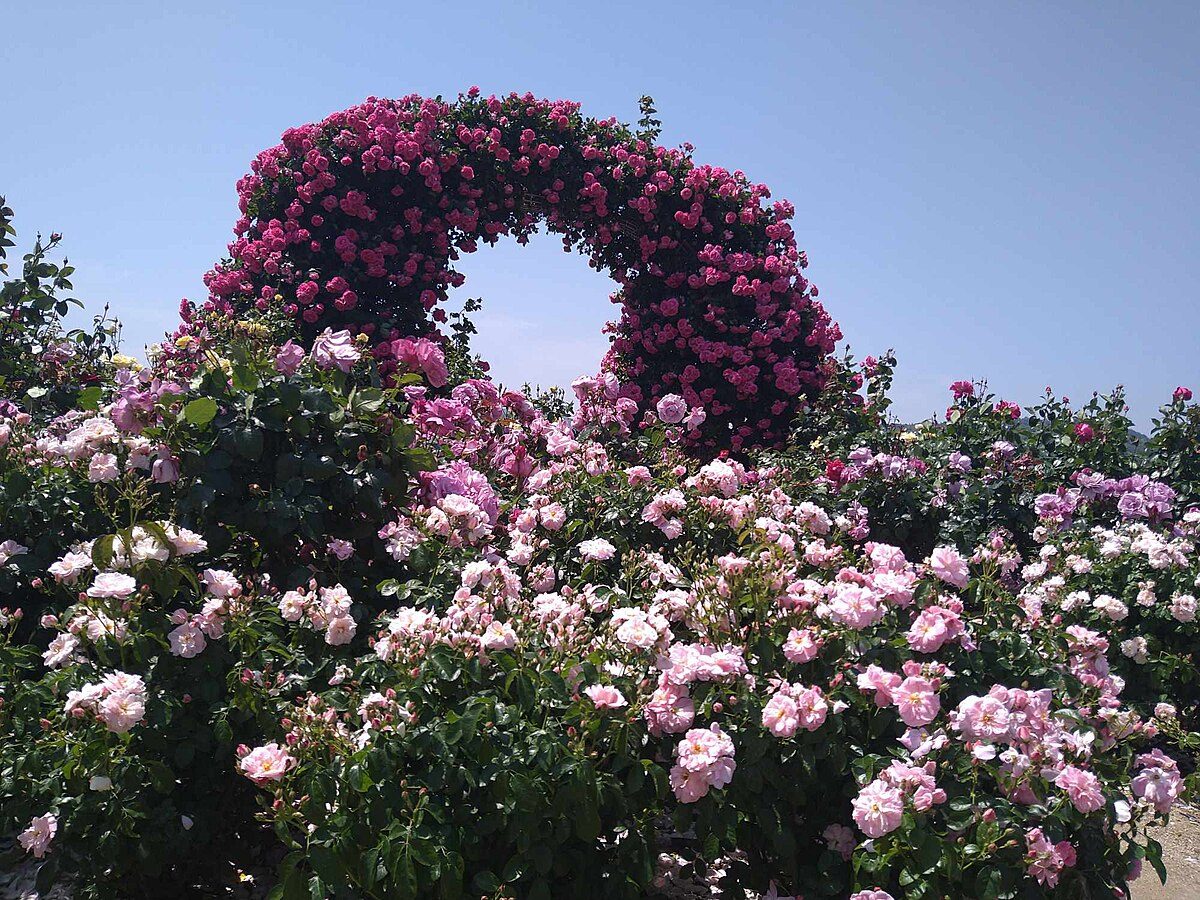
Yoshiumi Rose Park is on the eastern side of the island and has over 400 varieties of roses. If you’re passing through in May or June when they’re blooming, it’s a nice stop. Outside rose season, skip it.
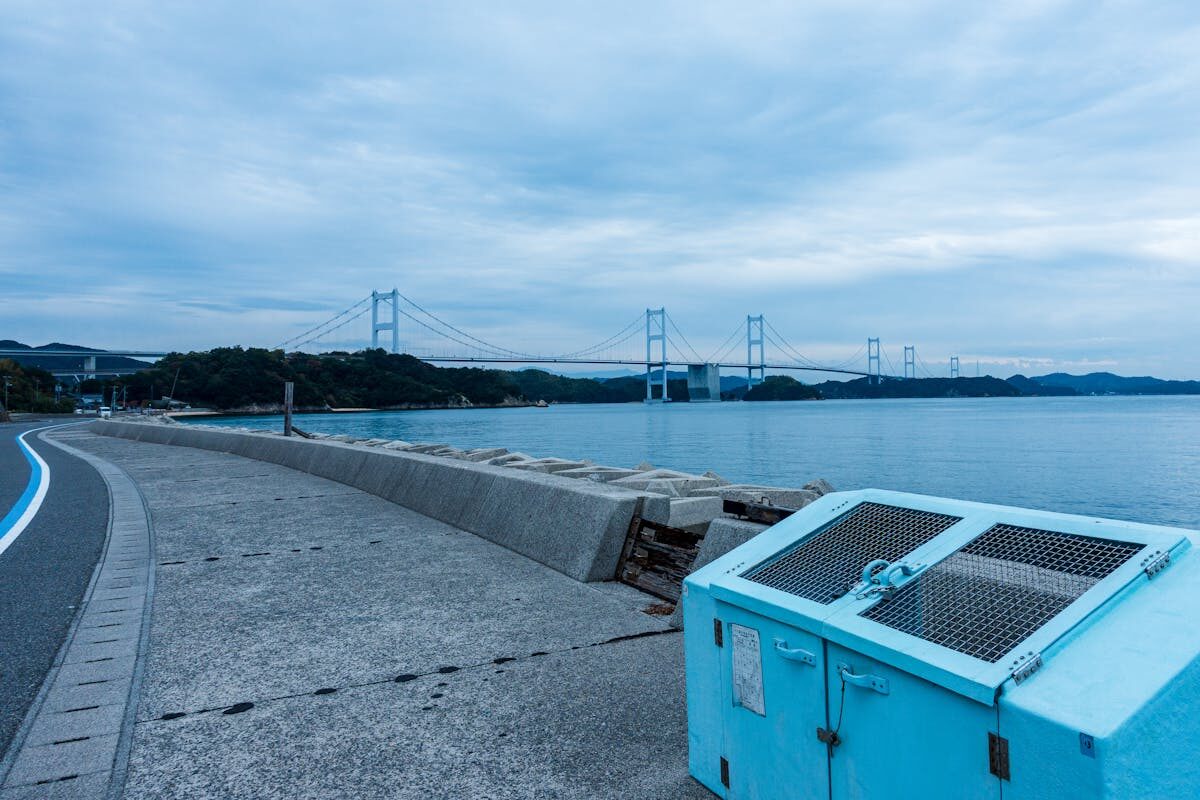
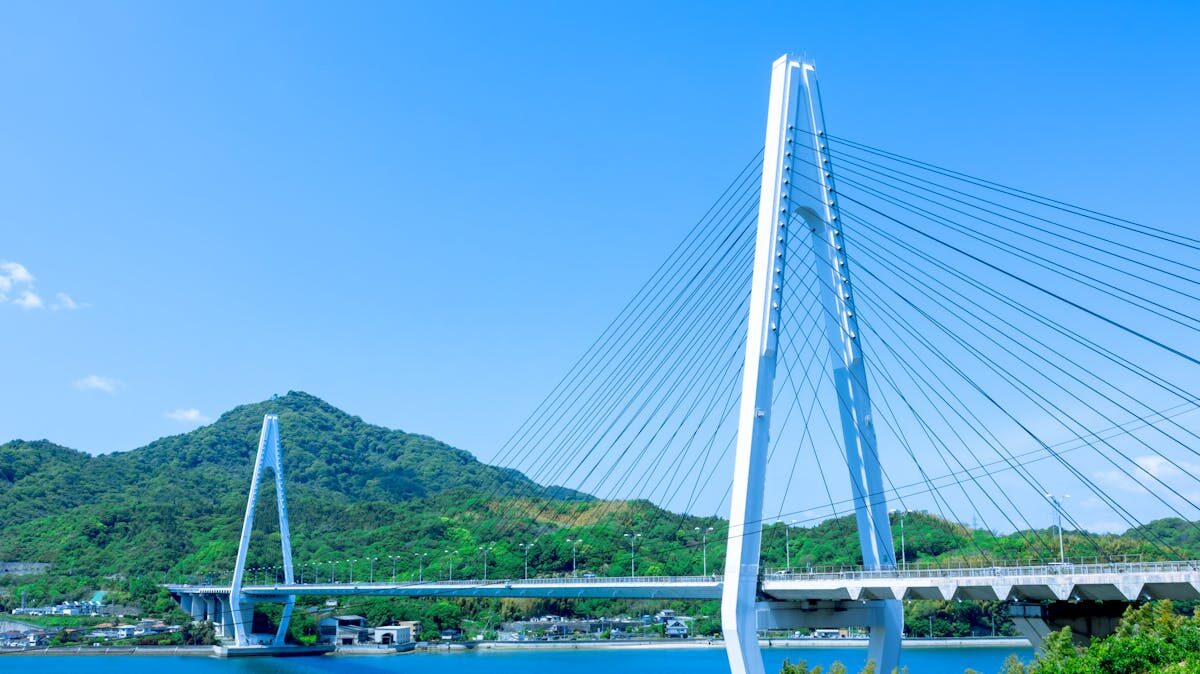
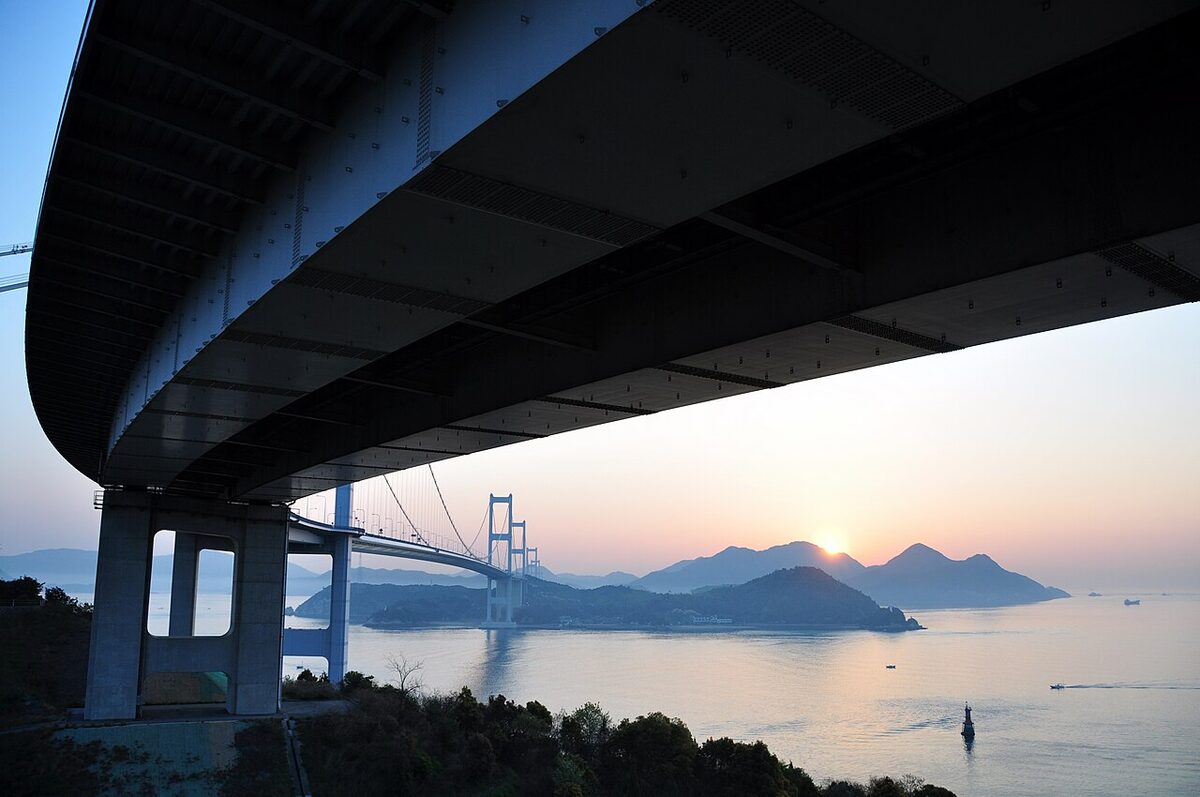
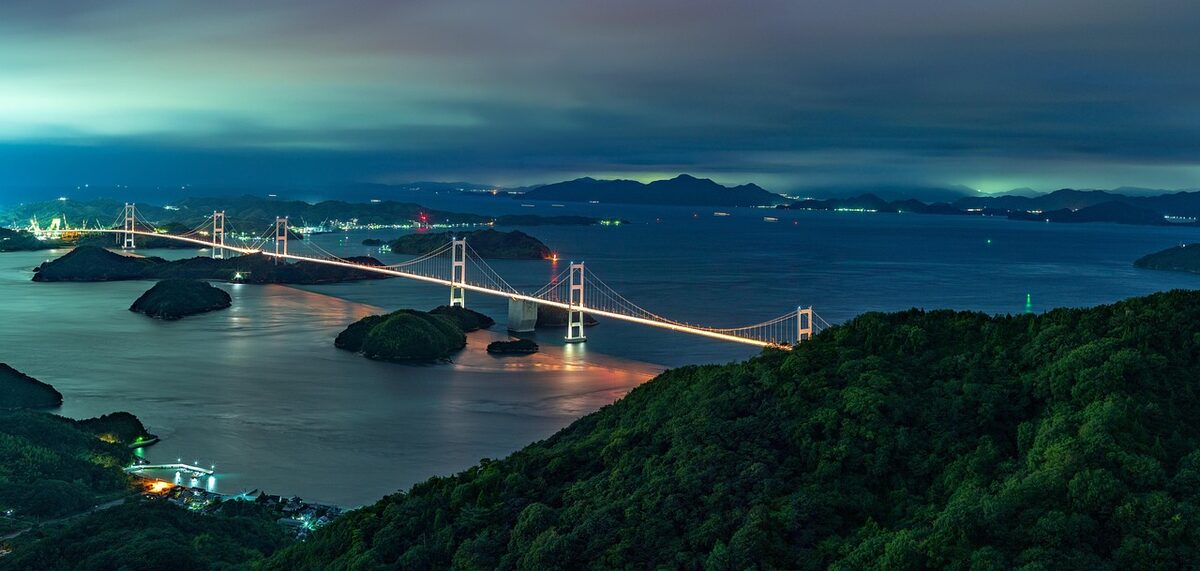
The Kurushima Kaikyo viewpoint near the bridge approach is worth a pause. From here you can see the full span of the Kurushima Kaikyo Bridge — actually three consecutive bridges totalling about 4km — stretching across to Imabari and Shikoku. It’s an impressive piece of engineering and a fitting end to the route.
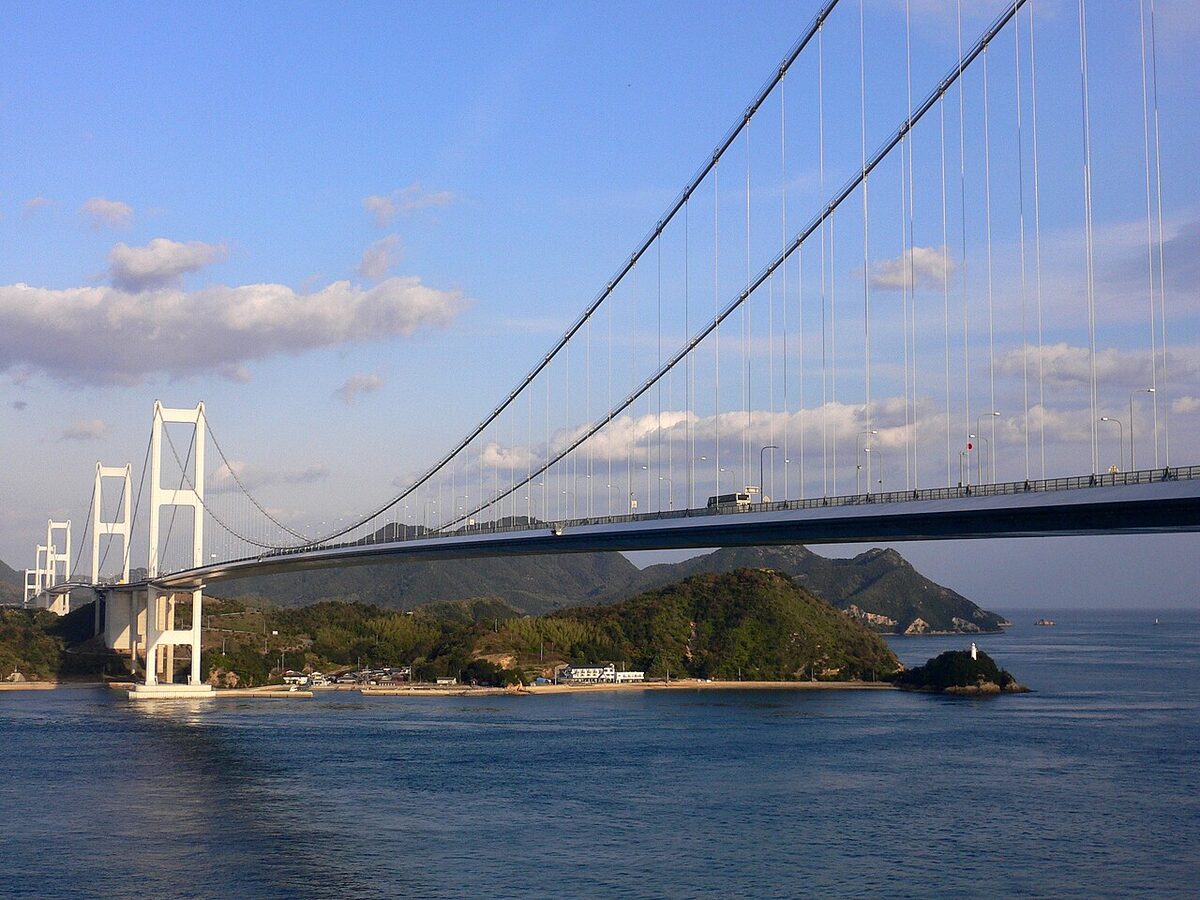
The Kurushima Kaikyo Bridge itself is the longest crossing on the Shimanami Kaido and arguably the most dramatic. You’re riding high above the Kurushima Strait, one of the most treacherous waterways in Japan with powerful tidal currents. Ships pass below, the city of Imabari grows closer, and there’s a real sense of accomplishment as you make the final crossing to Shikoku.
After the bridge, you’ll descend the approach ramp and follow the blue line through Imabari’s outskirts to the Sunrise Itoyama terminal, where you can return your rental bike. The ride from the bridge to the terminal is about 6km on flat, mostly unremarkable urban roads. After 70km of islands and sea, it’s a somewhat anticlimactic finish, but by then you won’t care — you’ll be thinking about food.
Where to Eat Along the Route
One of the genuine pleasures of the Shimanami Kaido is the food, but you need to plan slightly ahead because the islands aren’t overflowing with restaurants. Some stretches have very little, and opening hours can be limited. Here’s what to eat and where.
Onomichi (Before You Start)
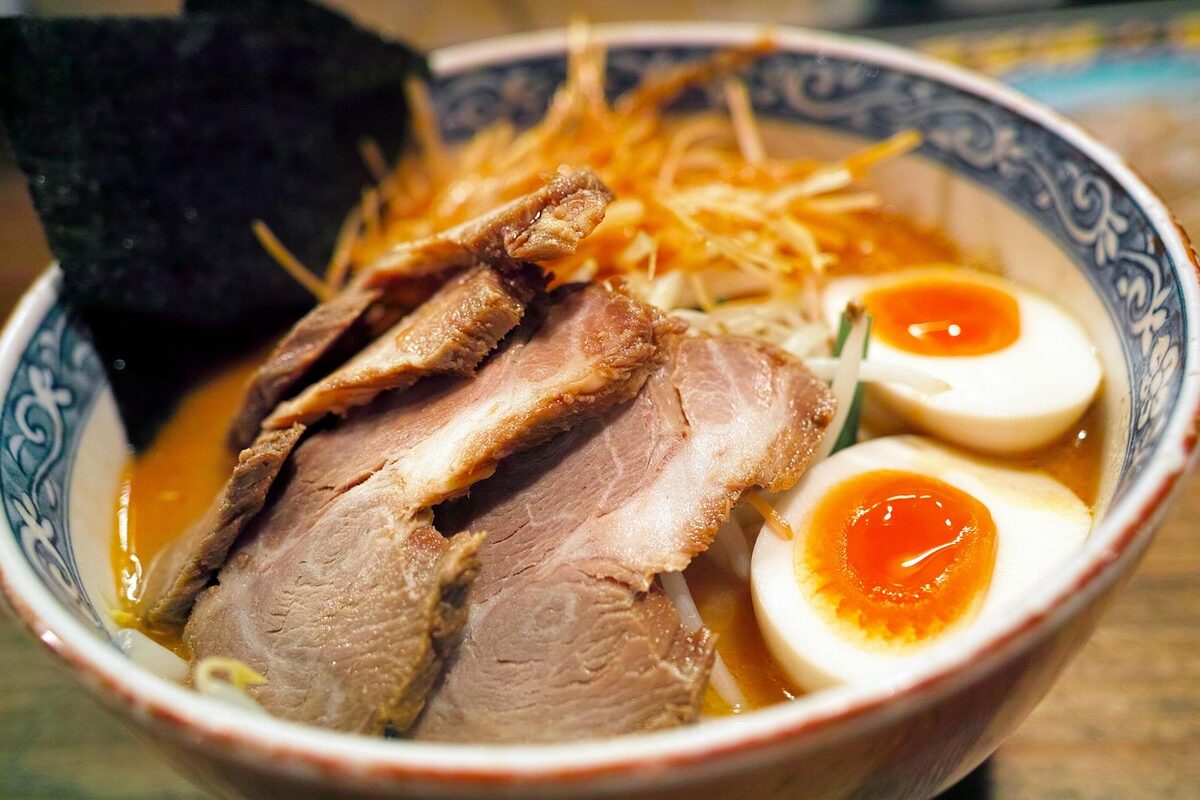
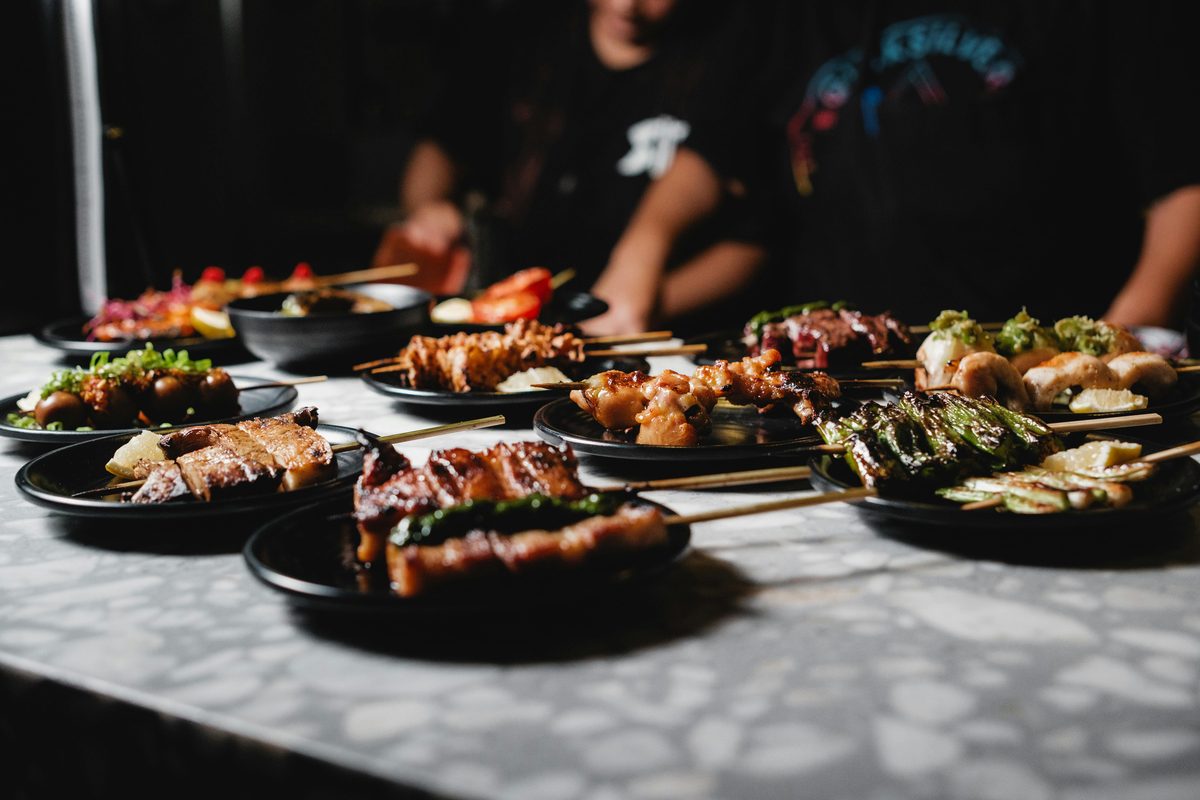
Eat breakfast or an early lunch in Onomichi before you get on the bike. The city is famous for Onomichi ramen — a soy-sauce-based broth with a fish stock backbone, topped with back-fat (seabura) that melts into the soup and gives it a rich, slightly sweet quality. It’s one of Japan’s great regional ramen styles, and there are dozens of shops in the city. Shukaen and Tani Ramen are reliable choices near the station, but honestly, most of the ramen shops in the shotengai (shopping street) are good. Get a bowl before you start riding. Starting the Shimanami Kaido with a belly full of hot ramen and the taste of pork fat still lingering is, in my opinion, the correct way to begin.
If ramen for breakfast isn’t your thing (fair enough), there are bakeries and cafes near Onomichi Station. Grab an onigiri and some tea from the convenience store at minimum — you want fuel in the tank before the first bridge.
Ikuchijima / Setoda (Mid-Route)

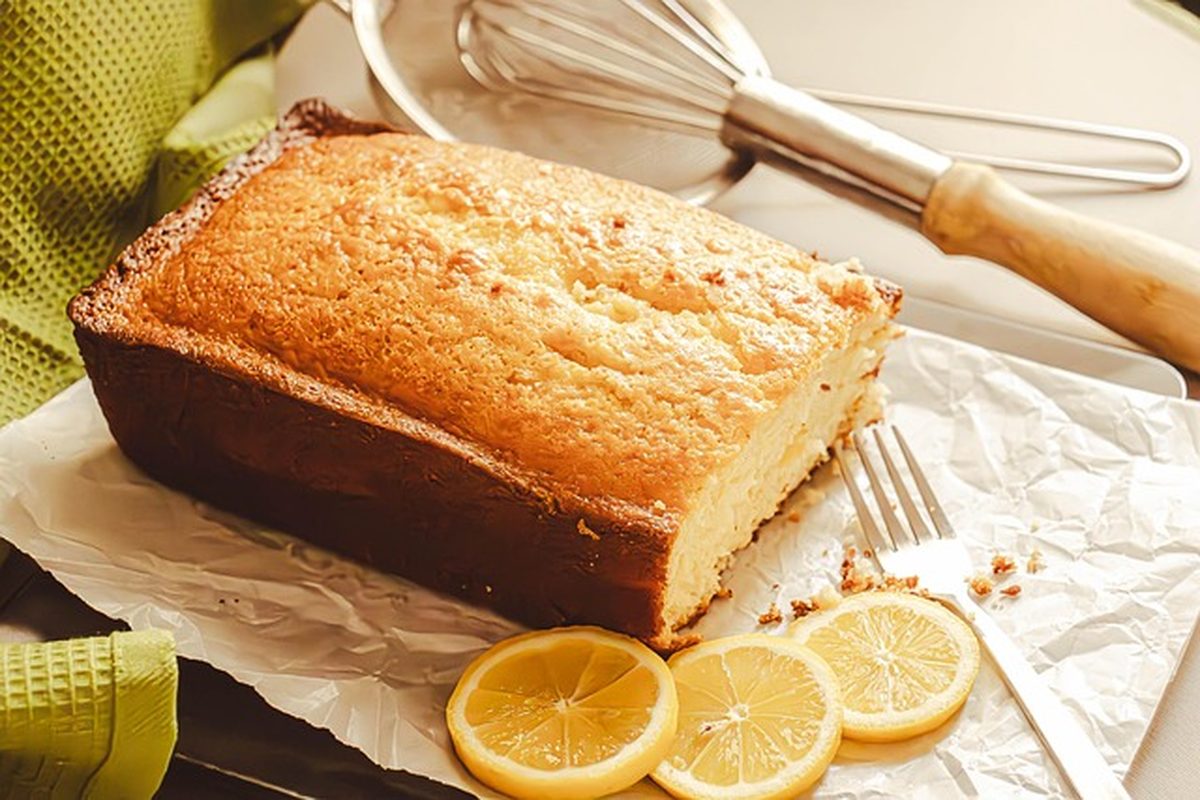
Setoda is the best eating stop on the route, and you’ll arrive around lunchtime if you started in the morning. The town’s identity is tied to Setoda lemons, and you’ll find lemon-flavoured everything: lemon gelato, lemon cake, lemon curd toast, lemon soda, and lemon-dressed seafood. Dolce, a gelato shop on the main street, is popular for a reason — the lemon gelato is tart and refreshing, exactly what you want after 30km of riding.
For a proper meal, look for the seafood restaurants along the waterfront and shopping street. Fresh fish is the move — sashimi sets, grilled fish, or chirashi bowls. The quality is high because you’re surrounded by fishing boats that were out that morning. Prices are reasonable, typically ¥1,000-2,000 for a set lunch.
There’s also a good okonomiyaki place or two in Setoda if you want something more filling. Hiroshima-style okonomiyaki (layered, with noodles) is the regional standard and makes solid cycling fuel — carbs, protein, and enough heft to keep you going through the afternoon.
Omishima
Omishima is quieter for dining, but there are a few options near Oyamazumi Shrine and the port areas. Mikan products are the local specialty — mandarin juice, mandarin soft-serve, dried mikan snacks. WAKKA resort has a cafe that’s open to non-guests and serves decent food with ocean views.
If you’re staying overnight on Omishima, your accommodation will likely offer dinner or point you to a local restaurant. Options are limited but the seafood is fresh.
Imabari (When You Arrive)
You’ll arrive in Imabari hungry. The local specialty is yakibuta tamago meshi — grilled pork belly laid over rice with a runny egg on top. It’s simple, salty, rich, and exactly what your body wants after 70km on a bike. Shigefuji, near Imabari Station, is the classic spot for it. There’s usually a queue, and it’s worth the wait.
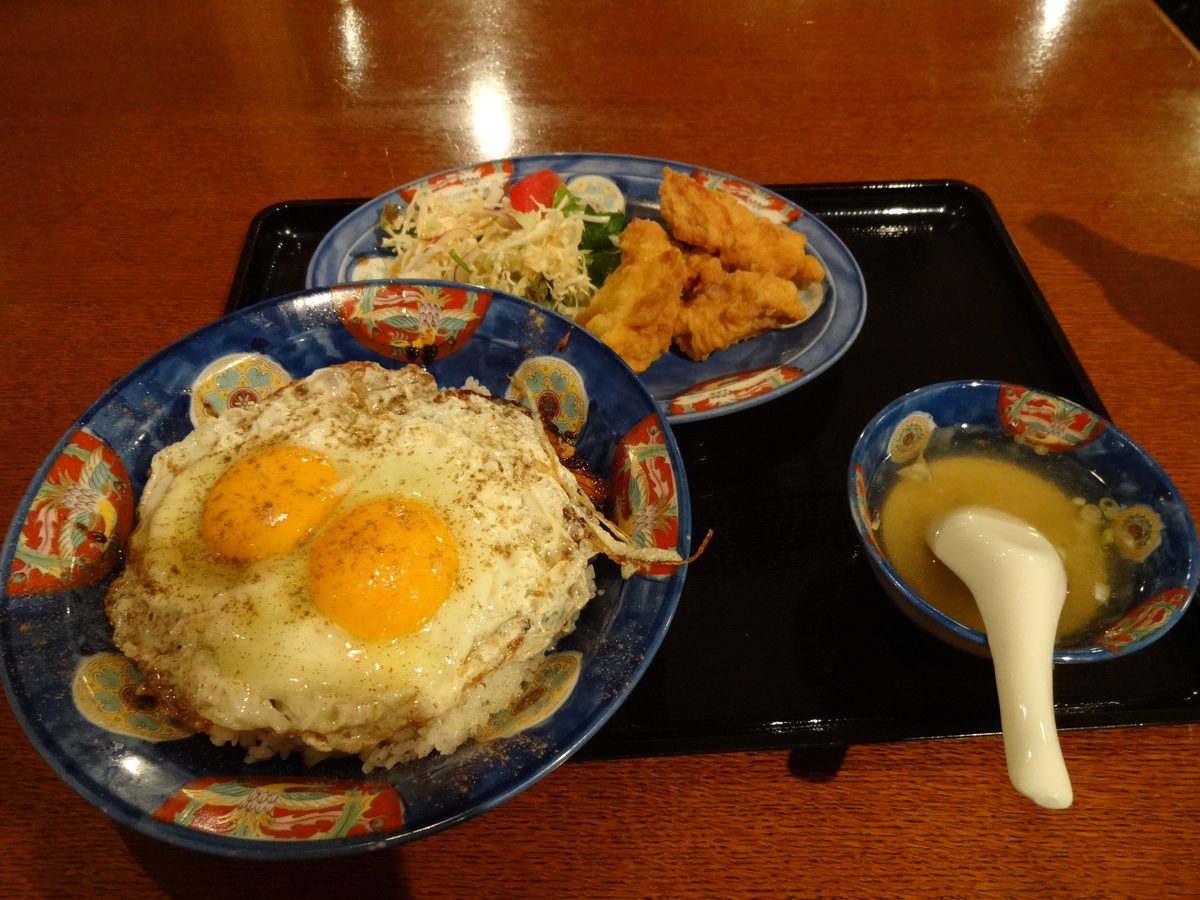
Imabari is also known for yakitori (grilled chicken skewers), specifically a style where the chicken is grilled with the skin on and served with a sweet soy glaze. Hit up one of the yakitori joints near the station for a post-ride meal with a cold beer. You’ve earned it.
Snacks and Hydration
This is important: carry water and snacks with you at all times. The islands are rural, and there are stretches — particularly on Hakatajima — where you won’t pass a convenience store or vending machine for 10-15km. Japan’s vending machines are legendary in their ubiquity, but “ubiquity” applies to cities, not to small islands with populations in the low thousands.
Fill up your water bottle (or buy a bottle from a vending machine) every time you see an opportunity. Grab onigiri, energy bars, or bananas from convenience stores on the larger islands. Dehydration and bonking (running out of energy) are real risks on a long ride in warm weather, and they’ll ruin your day faster than anything else.
Konbini (convenience stores) are reliably found on Innoshima, Ikuchijima, and Omishima. Mukaishima, Hakatajima, and the less-developed parts of Oshima are spottier. Plan accordingly.
Where to Stay
If you’re doing the ride in two days, you need somewhere to sleep on one of the islands. Here are the best options.
Ikuchijima (Setoda Area)
Setoda Private Hostel — A budget-friendly option near Sunset Beach. Clean, simple, and popular with cyclists. Dorm beds and private rooms available. The location is convenient for exploring Setoda in the evening and getting back on the bike in the morning. Expect to pay around ¥3,500-5,000 per person.
There are also several guesthouses and minshuku (Japanese-style B&Bs) in the Setoda area. Availability varies by season, so book ahead during peak periods. A few higher-end options have opened in recent years as the Shimanami Kaido’s popularity has grown.
Setoda is my top recommendation for an overnight stop because it has the most going on — restaurants, cafes, the temple, the beach — and it’s roughly at the halfway point.
Omishima
WAKKA — This is the cyclist-focused resort near Inokuchi Port, and it’s genuinely well done. Accommodation ranges from dorm beds (around ¥5,000) to private cottages and glamping domes (up to ¥15,000 per night). The facilities include bike storage, a repair station, laundry, a cafe, and a communal lounge area. The setting — right on the waterfront, looking out across the Seto Inland Sea — is excellent. If you want more comfort than a basic hostel but don’t need a full hotel, WAKKA is a strong choice.
Tomarigi Guesthouse — Another good option on Omishima, smaller and more intimate than WAKKA. Run by a friendly owner, it has a homey atmosphere and is well-reviewed by cyclists. Book directly.
Free Camping
For the budget-conscious or adventurous: Michikajima Campsite is a free campsite on a tiny island accessible by bridge from Omishima. It’s basic — think flat ground, toilets, and not much else — but the price is right and the setting is peaceful. You’ll need to carry your own camping gear, obviously, which adds weight to the ride. A few other free or cheap campsites exist along the route; ask at the rental terminals for current information.
Imabari
If you’re finishing late and don’t want to take the bus back to Onomichi the same day, Imabari has plenty of business hotels near the station starting from around ¥5,000 per night. They’re nothing special — functional rooms, tiny bathrooms, free Wi-Fi — but they’re clean and convenient. Imabari isn’t a tourist town, so don’t expect charm, but it does the job as a base for the night before moving on.
Practical Tips

Here’s everything else you need to know, in no particular order.
Follow the Blue Line
I’ve mentioned this already, but it bears repeating: the entire route is marked by a blue line painted on the road surface. Follow it. The line runs from the Onomichi ferry terminal to the Sunrise Itoyama terminal in Imabari, including up and over every bridge approach. It’s supplemented by regular signposts showing distances and directions. You do not need a GPS, a map, or a navigation app. Just follow the blue line. If you stop seeing the blue line, you’ve gone off-route — turn around and find it again.
There are actually different coloured lines for different destinations (green for a shorter route, etc.), but blue is the standard Shimanami Kaido route. Stick with blue.
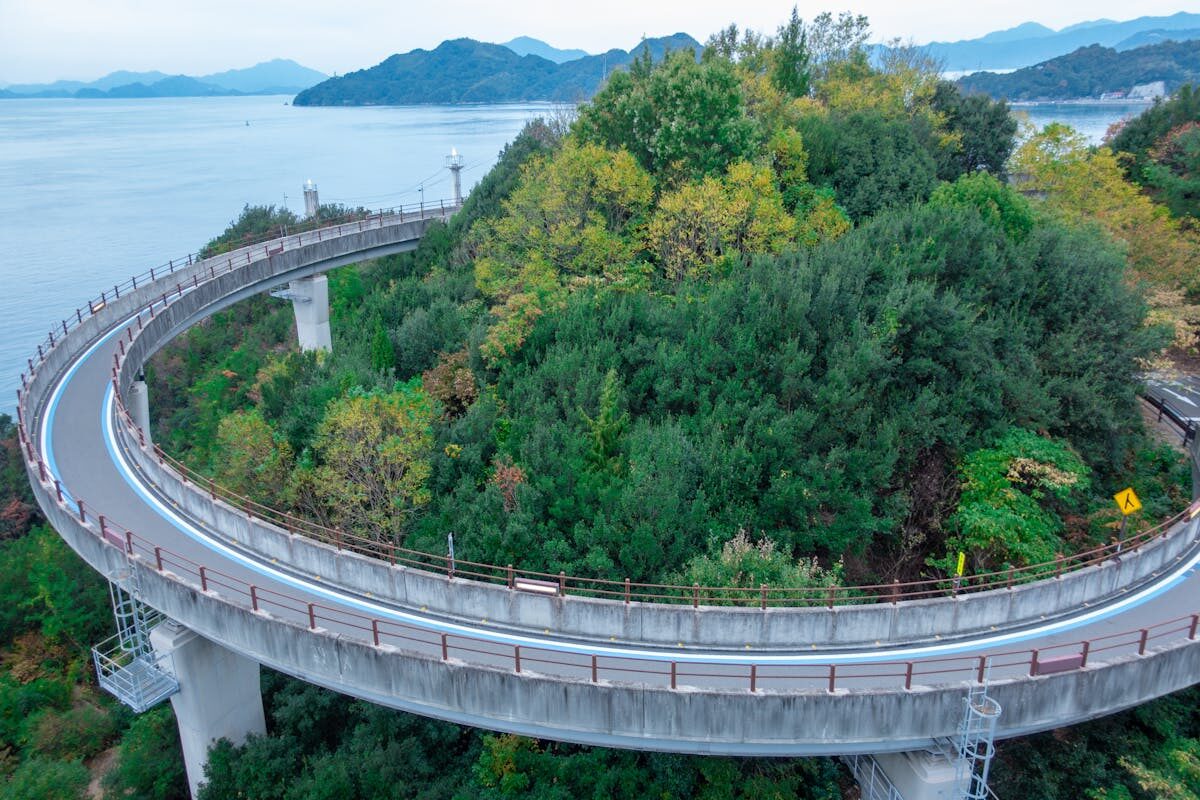
Bridge Approaches
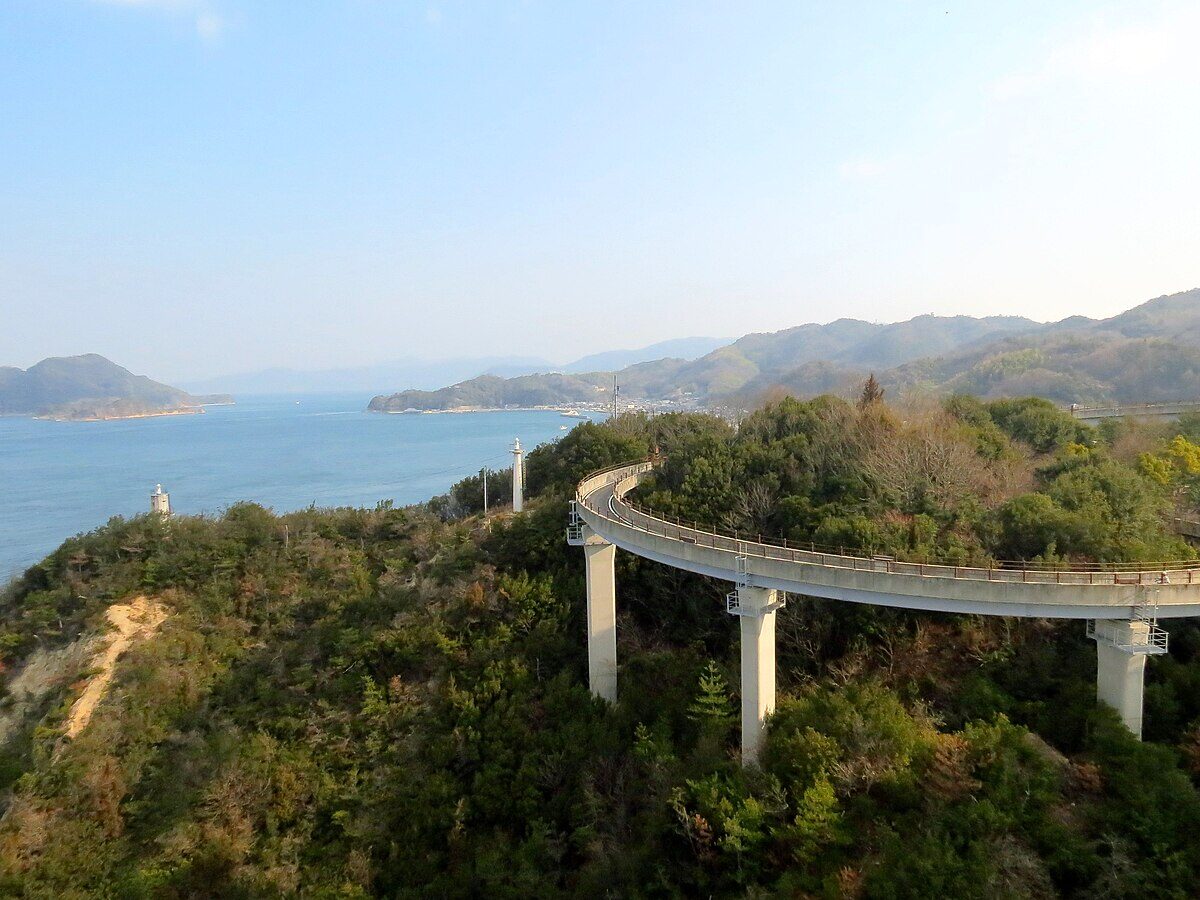
The bridges are high — they need to be, to allow large ships to pass underneath. This means each bridge has a long approach ramp that climbs from sea level to the bridge deck, which can be 50-70 metres above the water. These ramps are the only significant climbing on the route.
The approaches take the form of long, winding ramps or spiral roads. They’re not steep — typically 3-5% gradient — but they’re long, sometimes 1-2km of continuous uphill. On a heavy rental bike with tired legs, they can feel relentless. This is where e-bikes earn their premium.
The good news: the descents on the other side are equally long and very enjoyable. Don’t bomb them at top speed, though — the ramps have tight turns, and there are pedestrians and other cyclists sharing the path.
Bridge Tolls
Free for cyclists as of 2026. You just ride across. No toll booths, no passes, no payments. This policy was introduced to promote cycling tourism and has been extended multiple times. It could theoretically change, but for now, it’s free.
Luggage Forwarding
If you’re travelling with luggage (and you probably are), don’t strap it to your bike. Use Japan’s excellent luggage forwarding service instead. Yamato Transport (look for the Kuroneko / black cat logo) will ship your bags from Onomichi to your accommodation in Imabari (or vice versa) for ¥2,800-5,800 per bag depending on size. You drop off your bags the day before or morning of the ride, and they arrive at your destination by evening.
Most hotels and many guesthouses will hold forwarded luggage for you. This service is a genuine game-changer — riding 70km with a heavy backpack is miserable, and there’s no reason to do it when Kuroneko exists. Convenience stores can handle the shipping for you; just bring your bag to a konbini with the Yamato Transport service (most FamilyMarts and 7-Elevens).
Which Direction?
Most people ride Onomichi → Imabari, and most guidebooks (including this one) describe the route in that direction. This is partly convention and partly practical — Onomichi is easier to reach from major cities like Hiroshima and Osaka, and the public rental system’s main terminal there is well-set-up for departures.
Some cyclists argue that Imabari → Onomichi is actually the better direction because you start with the Kurushima Kaikyo Bridge — the longest and most dramatic crossing — while you’re still fresh and excited. There’s something to this argument. Starting with the most impressive bridge and then working through progressively quieter islands has a different rhythm that some people prefer.
Practically speaking, it doesn’t matter much. The route is beautiful in both directions. The wind tends to blow from west to east, which marginally favours the Onomichi → Imabari direction, but it’s not consistent enough to be a deciding factor. Pick whichever start point is more convenient for your broader itinerary.
Best Time to Ride
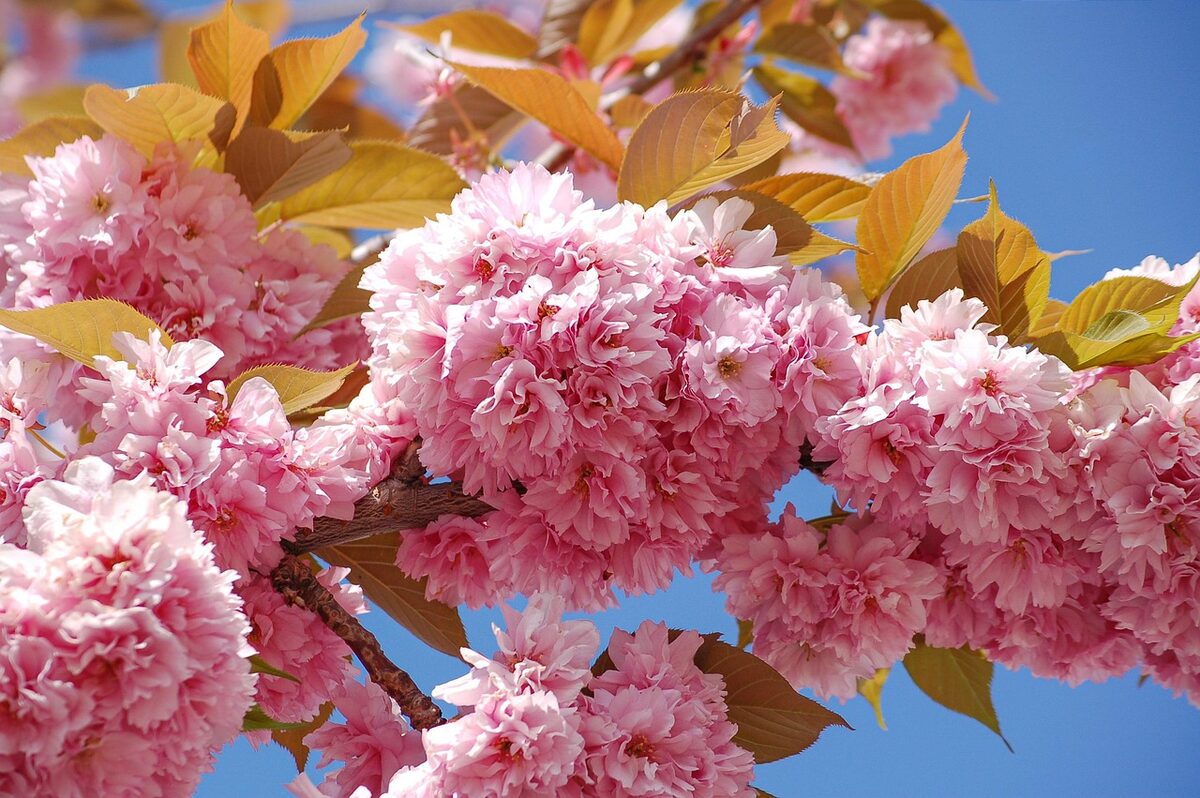
March to May (spring) is the most popular period and for good reason. Temperatures are comfortable (15-22°C), cherry blossoms appear on some islands in late March and early April, and the light over the Inland Sea is gorgeous. April and May weekends can be crowded at rental terminals — book ahead.
September to November (autumn) is equally good. Cooler temperatures after the summer heat, autumn colours appearing in late October and November, and smaller crowds than spring. This is arguably the ideal time for cycling — warm enough to be comfortable, cool enough that you’re not drenched in sweat.
Summer (June to August) is hot and humid. Temperatures regularly hit 30-35°C with high humidity, and there’s limited shade on many stretches. It’s doable — locals cycle it all summer — but you need to be serious about hydration and sun protection. Start early in the morning to avoid the worst heat. The upside: Sunset Beach is at its best for swimming.
Winter (December to February) is cold but rideable. Temperatures hover around 5-10°C, and the islands are very quiet. You’ll have the route almost to yourself. It can be atmospheric in a stripped-down way — grey seas, bare trees, no crowds. Not everyone’s cup of tea, but if you don’t mind the cold, it’s a unique experience.
What to Bring
- Sunscreen: Even on overcast days, you’re exposed for hours. Apply generously and reapply.
- Water bottle: At least one, preferably two. Refill at every opportunity.
- Padded cycling shorts: If you own them, bring them. 70km on a rental bike saddle is a lot of contact time. If you don’t own padded shorts, consider buying a cheap pair — your backside will thank you.
- Rain jacket: Weather can change quickly over the Inland Sea. A lightweight, packable rain jacket takes up almost no space and saves a miserable wet ride.
- Phone mount: Not strictly necessary (the blue line is enough for navigation), but useful for photos and checking the time without stopping.
- Small backpack or handlebar bag: For snacks, water, sunscreen, rain jacket, and whatever else you’re carrying. Keep it light.
- Cash: Some island shops and restaurants are cash-only. Carry at least ¥5,000-10,000 in cash. There are ATMs on the larger islands but don’t rely on finding one when you need it.
- Towel: If you plan to swim at Sunset Beach or anywhere else. A quick-dry travel towel packs small.
Getting There
Both start/end points are well-connected to major cities by train.
Getting to Onomichi
From Hiroshima: Take the JR Sanyo Line from Hiroshima Station to Onomichi Station. It’s about 1.5 hours and costs approximately ¥1,500. No reservation needed — just hop on a local train. This is the most common approach and the simplest.
From Osaka: Take the Shinkansen (bullet train) from Shin-Osaka to Fukuyama Station (about 1 hour, ¥10,000 with reserved seat), then transfer to the JR Sanyo Line local train to Onomichi (about 20 minutes, ¥420). Total journey time is roughly 1.5-2 hours.
From Tokyo: Shinkansen from Tokyo Station to Fukuyama (about 3.5 hours), then local train to Onomichi. If you have a Japan Rail Pass, the Shinkansen is covered. Without one, expect to pay around ¥17,000-18,000 for the full journey.
Getting to Imabari
From Matsuyama: JR Yosan Line from Matsuyama Station to Imabari Station. About 1 hour, approximately ¥1,500. Straightforward.
From Osaka/Okayama: Shinkansen from Shin-Osaka to Okayama (about 45 minutes), then the JR Shiokaze limited express from Okayama to Imabari (about 2.5 hours). Total journey time is roughly 3-3.5 hours. The Shiokaze runs through some beautiful scenery across the Seto Ohashi Bridge.
Returning After the Ride
Unless you’re continuing your trip from whichever city you end up in, you’ll need to get back to your starting point.
Bus from Imabari to Onomichi: The Shimanami Liner highway bus runs between Imabari and Onomichi, taking about 1.5 hours and costing approximately ¥2,500. This is the most popular return option. Buses run several times daily, but check the schedule in advance — they’re not super frequent, and the last bus can be earlier than you’d expect. Note that the bus crosses the Shimanami Kaido expressway, so you’ll see the bridges from the car deck — a different perspective from the cycling path.
Ferry options: Various ferry routes connect the islands and both end cities. Schedules and availability change, so check current timetables. The ferries are generally less convenient than the bus but can be useful depending on your specific situation.
Train: There’s no direct train between Imabari and Onomichi. You’d need to go via Okayama or Fukuyama, which is a long detour. The bus is much better for a direct return.
Budget Breakdown
Here’s what the Shimanami Kaido costs, realistically.
One-Day Budget
| Item | Cost |
|---|---|
| Bike rental (city bike, public system) | ¥3,000 |
| Onomichi → Mukaishima ferry | ¥110 |
| Bridge tolls | ¥0 (free) |
| Food and drinks | ¥2,000-3,000 |
| Return bus (Imabari → Onomichi) | ¥2,500 |
| Total | ¥7,600-8,600 |
That’s roughly US$50-57 at current exchange rates. For a full day of world-class cycling across six islands, that’s absurdly good value.
Two-Day Budget
| Item | Cost |
|---|---|
| Bike rental (2 days, city bike) | ¥6,000 |
| Onomichi → Mukaishima ferry | ¥110 |
| Bridge tolls | ¥0 (free) |
| Food and drinks (2 days) | ¥4,000-6,000 |
| Accommodation (1 night) | ¥3,500-15,000 |
| Return bus (Imabari → Onomichi) | ¥2,500 |
| Sightseeing (Kosanji, Oyamazumi, etc.) | ¥1,000-2,400 |
| Total | ¥17,100-32,000 |
The range is wide because accommodation costs vary enormously — from ¥3,500 for a hostel dorm to ¥15,000 for a nice cottage at WAKKA. Even at the high end, though, a two-day Shimanami Kaido trip is affordable by Japanese tourism standards.
Add ¥2,800-5,800 for luggage forwarding if you use it (recommended). Add ¥1,000 if you upgrade to an e-bike.
Is It Worth It?
Yes. Without reservation.
The Shimanami Kaido is one of those rare travel experiences that delivers exactly what it promises. The cycling infrastructure is excellent. The scenery is beautiful. The logistics are straightforward. And the feeling of riding a bicycle across a bridge 60 metres above the sea, with islands stretching to the horizon in every direction, is something that doesn’t translate to photos or descriptions. You have to be there, on the bike, with the wind and the salt air and the sound of your own breathing.
That said, I want to be honest about what the Shimanami Kaido isn’t. The islands between the bridges are quiet and rural. They’re not packed with attractions or nightlife or shopping. Long stretches of the ride are just you, the road, the sea, and small-town Japan going about its business. If you need constant stimulation — activities, crowds, things to do every five minutes — you might find the quieter stretches boring. I’ve seen reviews from people who expected a theme park of attractions and were disappointed that some islands are just… islands. Quiet places where people live and work.
But that quietness is the point, or at least a big part of it. The Seto Inland Sea is beautiful in an understated way. It doesn’t hit you over the head with drama. It’s calm water reflecting clouds, small fishing boats heading out at dawn, citrus groves running down hillsides to rocky shores, and silence — real silence, the kind you forget exists when you’ve been in Tokyo or Osaka for a week. The Shimanami Kaido gives you something that’s increasingly hard to find in modern travel: a reason to slow down, a way to move through a landscape at human speed, and enough beauty to make the effort feel meaningful.
Rent a bike. Follow the blue line. Stop when something interests you. Keep pedalling when it doesn’t. Eat ramen at the start and pork belly at the end. That’s the whole formula, and it works.